It has been a while since any updates. Life, kids, family, and a whole lot of steel work has been going on. Here are some pictures of when we finally made it down to site to see the finished concrete work. Unfortunately due to a lag on construction program, the sunken fire pit saw a lot of rain and subsequently filled up like a spa. We ended up siphoning out the water with a garden hose which took almost 24 hours to get it dry.
Wednesday, December 21, 2011
Tuesday, November 1, 2011
Wednesday, August 17, 2011
Concrete steaming
Here's a video of the tense few minutes when we took off the forms. Notice the steam rising from the curing concrete. It was warm to the touch. There is some surface level honeycombing at the bottom of the wall that we should be able to patch.
The Pour
It finally happened. After delays caused by weather, materials, and last minute structural changes, we finally got the walls poured last week. The results were almost entirely positive (with some minor honeycombing issues in the concrete). I'll let the pictures speak for themselves. All in all, we are pleased to have spent the extra time and money to experiment with the "barn-form" finish and think its going to add a really unique look to the project.
Approach view of walls in hillside
Interior view of the wall before pour
Barn form boards being installed at lower walkout locations. The interior wall has the boards oriented vertically where the external finish has the boards oriented horizontally. Looking good D & D.
Last minute reinforcement at steel column locations. Thank you Chach! No really....thanks for this information as the concrete trucks are pulling up to site.
Is it a concrete pump truck or a transformer? I need to get one of these for the sandbox.
Concrete being delivered to back of pump truck. There were five trucks for a total of 45 cu. yards (we only ended up using 40 cu. yards)
Pump hose extended
Marlon, one of the D's, and Rick pouring and compacting the concrete.
And now for what everyone's been waiting for.....
.....Enough said
Now on to the STEEL!
Monday, August 8, 2011
Firepit
The shelves next to either side of the fireplace are to be custom made from reclaimed barn wood that we are using for the "barn-form" concrete finish. The fireplace is rebuilt from the existing house with river rock from nearby Big Buffalo Creek and a grinding wheel from nearby Boyler's Mill. The vertical faces of the pit seating will be "barn-form" finish. The in-situ built-in seat will be faced with wood trim with throw pillows.
Friday, July 22, 2011
"Barn-form" Concrete
For those of you who know my architectural sensibilities, are aware that I have been fascinated with board-form concrete for a long time and have been waiting for the right project to experiment.
For a brief primer to those who are unfamiliar, board-form concrete is a throw-back method of concrete work before the advent of aluminum or plywood forms. Since timber planks were the most economical and readily available material, the forms for concrete walls were constructed from timber boards. This left a rather rich aesthetic in the concrete walls since the finished concrete adhered to the wood grain and the gaps between the boards.
There has been a revival of board-form concrete (particularly in the Pacific Northwest) with the likes of Cutler Anderson, Olsen Kundig, and Bohlin Cywinski Jackson. One of my all time favourite projects is a guest house by James Cutler that tastefully uses board-form concrete walls to enclose an earth sheltered dwelling.
Another great example of board-form concrete work and particularly close to my heart is the Hayward Gallery in London. I'm sure Prince Charles still thinks its a "monstrous carbuncle", but it is a beautiful exemplar of quality board-form concrete.
For Timbersprings, we wanted to experiment with board-form concrete but imbue it with a local flare. Dad had the idea of utilising reclaimed barn siding (locally sourced) and we went on the hunt to find old barns.
We ended up finding a guy in Higginsville, MO via Craigslist who had recently torn down an old barn and had 1x12 planks with a great weathered quality.
After seeing the mock-up, both Dad and I were really pleased and anxiously await when the forms will be stripped off and a beautifully textured "barn-form" concrete wall emerges.
For a brief primer to those who are unfamiliar, board-form concrete is a throw-back method of concrete work before the advent of aluminum or plywood forms. Since timber planks were the most economical and readily available material, the forms for concrete walls were constructed from timber boards. This left a rather rich aesthetic in the concrete walls since the finished concrete adhered to the wood grain and the gaps between the boards.
There has been a revival of board-form concrete (particularly in the Pacific Northwest) with the likes of Cutler Anderson, Olsen Kundig, and Bohlin Cywinski Jackson. One of my all time favourite projects is a guest house by James Cutler that tastefully uses board-form concrete walls to enclose an earth sheltered dwelling.
Another great example of board-form concrete work and particularly close to my heart is the Hayward Gallery in London. I'm sure Prince Charles still thinks its a "monstrous carbuncle", but it is a beautiful exemplar of quality board-form concrete.
Old schoolhouse near the Farm
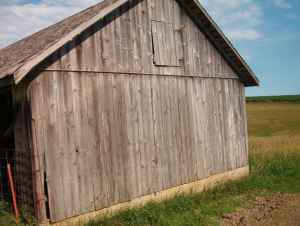
Barn up the road from the Farm
We ended up finding a guy in Higginsville, MO via Craigslist who had recently torn down an old barn and had 1x12 planks with a great weathered quality.
Barn before dismantling
1x12 planks
The next step was to do a mock-up on site to see how well the boards would match-up to the forms. The boards will line the forms and act as a negative mold when poured. In this way, areas of splintered wood and/or nail holes will protrude from the wall. The forms are set to a 10" wall and therefore the finished wall will be approximately 9 1/4" thick. Where there is board-form on both sides of the wall (at the walkout) the finished wall will be approximately 8 1/2" thick. We are running the boards vertically on the interior and horizontally on the exterior. Since the boards are true 1x12's, they will need to be ripped to provide a 1/8" gap to match the gap along the concrete wall ties. The horizontal orientation is slightly trickier since the boards will need to be notched around the concrete wall ties.After seeing the mock-up, both Dad and I were really pleased and anxiously await when the forms will be stripped off and a beautifully textured "barn-form" concrete wall emerges.
Subscribe to:
Posts (Atom)